Hoof Rasp Blank Preparation and Tooth Cutting
Relia prepares hoof rasp blanks and forms the teeth in-house. For a useful specification, identify the body and tang first, then mark the active tooth area and cut on each face. The flat 14-inch catalogue model gives a measurable comparison of 45 and 50 mm body widths.
- Named model
- Flat 14-inch double-sided rasp
- Published body widths
- 45 and 50 mm on that listing
- Drawing reference
- Shoulder, tooth field and tang
The Blank Sets the Reference Points
A blank is the shaped steel body before the finished tooth fields are established. Use the same shoulder reference on the drawing and sample when the tang location controls grip fit.
Body envelope
Record the body length, width and thickness. Mark where the width is measured, particularly on tapered or curved profiles.
Shoulder and tang
Show where the handle begins and the tang root, tip and insertion depth. Ask for a fitted sample when grip seating matters.
Working limits
Mark where each tooth field starts and ends. Keep clearance from the handle and round nose as explicit drawing details where relevant.
How the Cutting Fields Are Specified
A tooth-cut instruction describes the face, the method or listed tooth profile, and the limits of its usable working area.
Locate each face
Call the faces shaping and finishing on the drawing. Use an orientation mark on a sample photograph so the faces still identify correctly when the tool is turned over.
Confirm the cut
Catalogue options may list chopped or milled teeth. Put the chosen option and intended surface result on the same line as the body width.
Approve the working appearance
Compare the pattern at the same position on the sample and drawing. An overall width gives the steel envelope; the tooth field shows the actual working contact.
One 14-Inch Tool With Two Body Widths
The linked flat double-sided alloy-steel model lists a 350 mm body and 4.8 mm thickness. You can compare 45 and 50 mm bodies at the same point, then choose the applicable tooth option for your request.
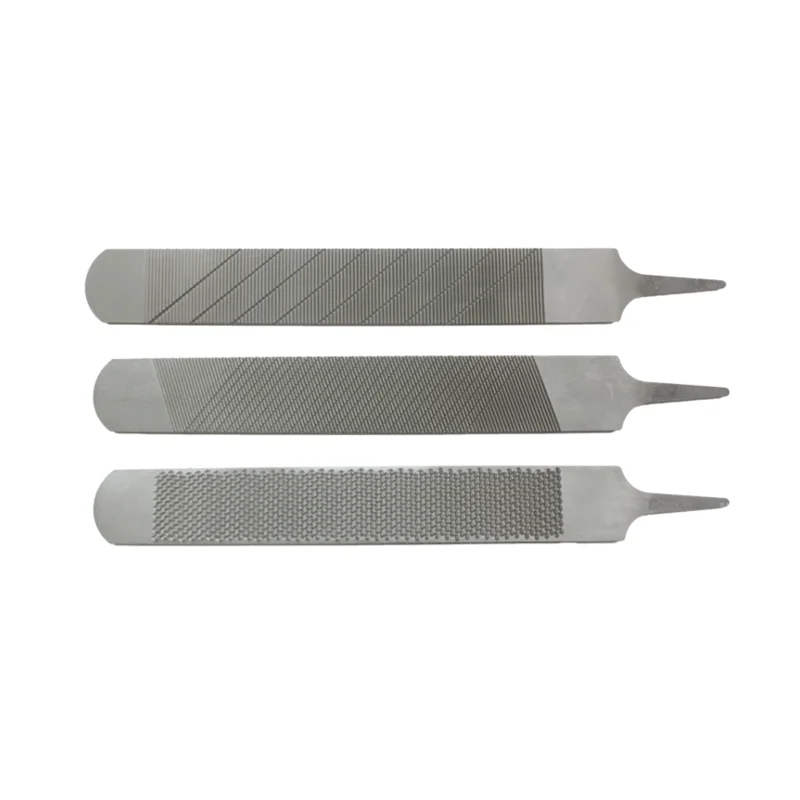
Read the 14-inch model listing
Check the model-specific measurements and chopped or milled options in the catalogue.
Compare the two widths on samples
Mark the same station and record both active faces.
What to Write on Each Face Approval
Pair each term with a picture or marked drawing that the sample and receiving teams can use.
| Purchase reference | What to verify |
|---|---|
| Shaping face | Identify the active tooth field, intended cut and where it begins and ends. Agree the surface reference if the result is important. |
| Finishing face | Write the required cut separately and record the expected finish. Use the same model and body width in the notes for both faces. |
| Taper or curve | Mark where the rasp should contact and where clearance is needed. Compare that station on the actual sample. |
Changes That Need a New Comparison
A change to tooth field, geometry or handle can change working contact. Carry the drawing revision into the order and keep prior and proposed samples identifiable.
- New cutting face
- Attach one straight-on image per face. The shoulder and tool orientation should be visible in both photographs.
- Tool shape or fit change
- Record the dimension from the original reference and identify the exact approved replacement geometry.
- Buyer sign-off
- Keep the accepted revision and sample identifier together for repeat production.
What to Include for a New or Repeat Rasp
Put enough information on the request for the model and cutting faces to be identified without guessing.
Body match
Catalogue model or drawing, body size and a marked measuring station.
Face match
Coarse and fine requirements on separate lines, with tooth field limits where important.
Handle match
Tang root and tip, packing configuration and fit reference if a grip is supplied.
Follow the Rasp From Steel to Inspection
After choosing the blank and cut, confirm the material condition and finished acceptance details for the same model.
See the factory exterior and production overview
The Relia factory panorama and four confirmed in-house stages.
Review steel and heat treatment
State the grade and finished test condition for the model.
Develop a prototype from your drawing
Pair the specification with agreed approval checks.
Send the Drawing and Both Working Faces
Include the body size, working areas, grip and planned volume. The marked drawing or sample reference can be used when reviewing the requested option.